
Element Instructions
An element gets into a set one of three ways: picked directly from the hierarchy tree explorer, the left panel of the Set Instructions editor - an element instruction, and the focus of this page; via Insert Using Formula, where the element is computed by a formula; or via Insert Element From Title, where it's read from whatever the current context is. Double-click an element in the hierarchy explorer (or drag-select several and click Add) and it's inserted into the Applied Instructions list as its own entry.
Right-click quick-add options
Right-clicking an element in the hierarchy explorer, instead of double-clicking it, opens a menu of shortcuts that combine adding the element with common follow-up instructions in a single click:
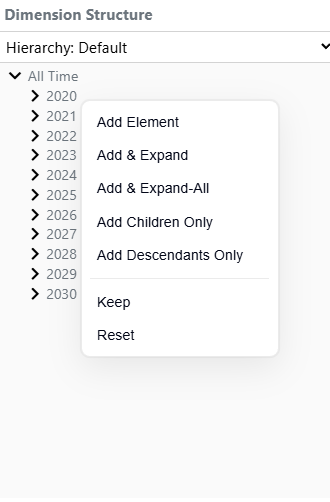
- Add Element - adds just the element you right-clicked, nothing else. The same result as double-clicking it.
- Add & Expand - adds the element, then expands it one level, showing its immediate children beneath it.
- Add & Expand-All - adds the element, then expands it fully, showing every level of descendant beneath it.
- Add Children Only - adds the element's immediate children as their own rows rather than the parent itself, with the parent re-added at the end as a total row, and drill-down enabled so a user can still expand further manually.
- Add Descendants Only - adds every leaf-level descendant as a flat list with no parent or subtotal rows at all - equivalent to Expand All followed by Remove Consolidations and Reset Indents.
Replaces the set, doesn't add to it
Every option in this menu replaces the set's entire existing instruction list rather than adding to it. Right-clicking an element and choosing any of these discards whatever instructions were already there in that set, with no confirmation prompt. Use double-click, or drag-select and Add, instead when you want to add to a set that already has instructions rather than start over.
Elements vs. instructions
The Applied Instructions list holds two different kinds of entry, and it matters which one you're looking at:
- Element entries (from the hierarchy explorer) - a specific element, or a handful of elements picked from a single position in the tree. This is the raw material - what's actually in the working list before anything manipulates it.
- Instructions (from the right-hand panel, or read about throughout the rest of this documentation - Set Formatting, Set Manipulation, Data Formatting, Advanced Functions) - these act on whatever elements are already in the working list.
Expand,Sort By Name,Format 0,000and the rest don't add elements themselves; they reshape what an element entry already put there.
Throughout this documentation, an element pick is written as a plain step in an instruction sequence - 1. Element: All Products - to keep it visually distinct from a Set itself.
Element entries are qualified by hierarchy
An element entry isn't just the element's name - it's recorded as <Hierarchy> - [<Element>], visible in the Applied Instructions list as e.g. Set - Default - [All Lines] (x1):
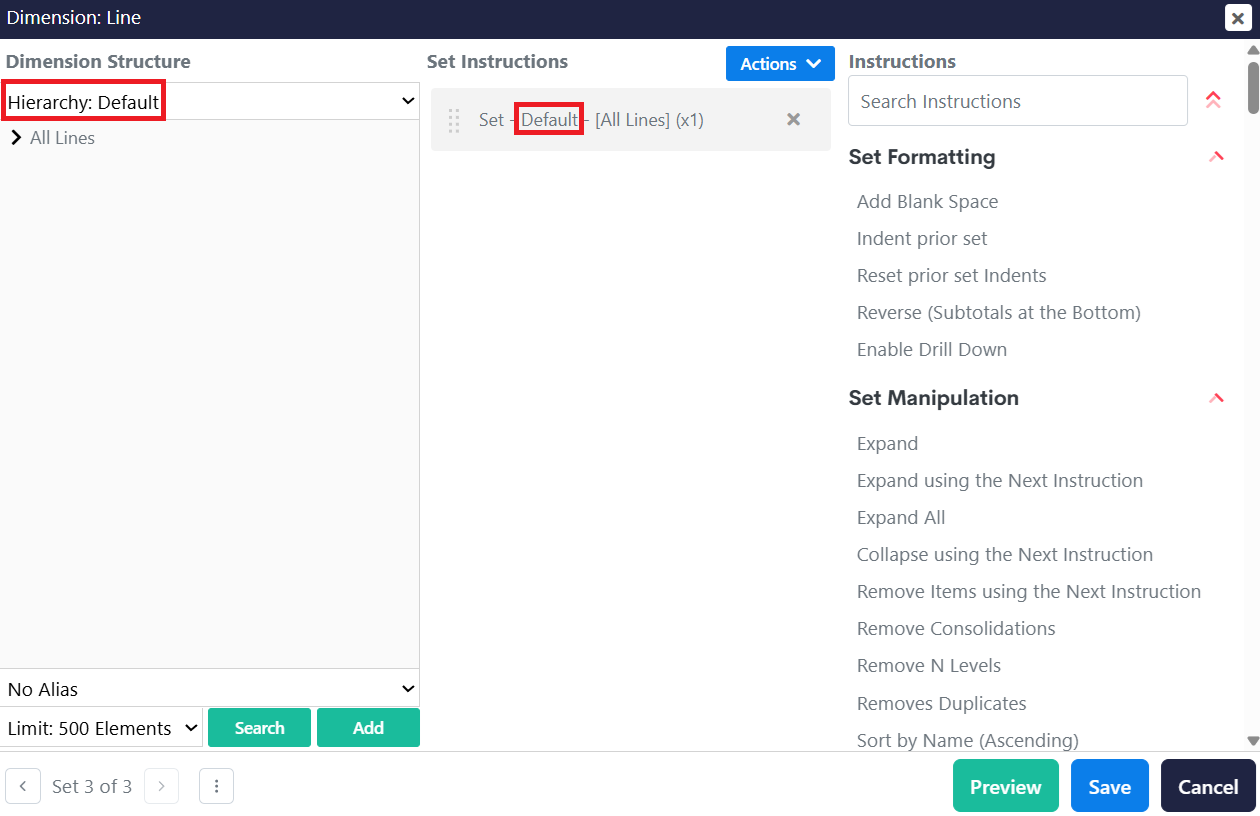
This matters because element names aren't required to be unique across a dimension's hierarchies - the same name can exist as a parent element in more than one hierarchy, grouping entirely different children in each. The hierarchy prefix is what tells MODLR which one a given element entry actually means.
Resolution order. An element entry resolves against a hierarchy in a fixed order:
- The parent-hierarchy pairing no longer holds (an entry recorded against a
Reporting Viewhierarchy, say, where the parent it named has since been removed fromReporting View) - falls back to theDefaulthierarchy. - Still not found in
Default- every other hierarchy on the dimension is checked in turn, in the order those hierarchies were added to the dimension. - Not found in any hierarchy - the entry fails to evaluate: the row or column it would have produced simply doesn't render, and any later instruction in the stack that depended on it doesn't act on it either.
Resolve it, don't rely on it
If you notice an element entry with no hierarchy recorded, or with a hierarchy prefix the parent is no longer actually part of, treat it as something to fix rather than something to leave to this fallback order - re-pick the element from its current, correct hierarchy. Relying on the fallback risks silently resolving against a same-named parent in the wrong hierarchy instead of the one you intended.
To confirm which hierarchy actually resolved for a given cell, right-click it in a Workview or Card and choose Explain Value. The trace's title shows the cell's full address, with each dimension's contribution written as <Hierarchy>»<Element>:
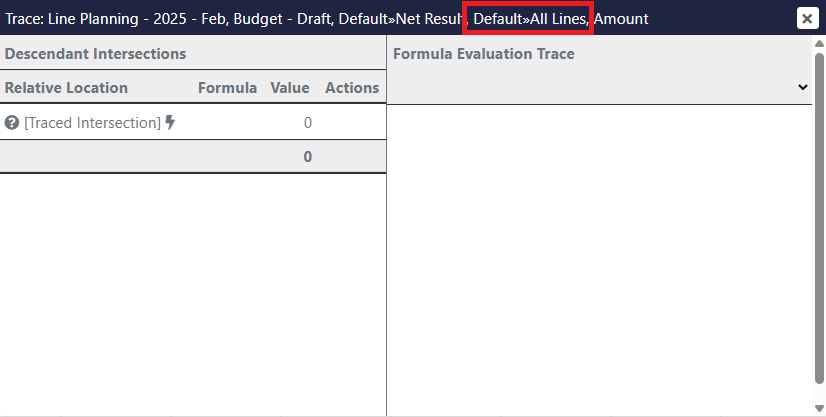
See Understanding a Cell Address for how this addressing works more generally, including when the hierarchy segment can be omitted.
A set can hold more than one element entry
A set isn't limited to a single starting element. Add more than one, in any order, and instructions later in the stack apply to everything added so far - which is how multi-branch layouts get built within a single set:
1. Element: Coolers Complete
2. Element: Stationmaster
3. Expand
Both brands are added as separate element entries, then Expand adds the immediate children of both - not just the one added most recently.
Fixed vs. computed
A manual element pick is fixed - it always refers to the same element until someone edits the set. Insert Using Formula and Insert Element From Title add an element to the working list the same way, but compute which element at runtime instead of reading it from a fixed pick in the tree. See the rest of the Element Insertion instructions for the full list.